Handstand Suction Bike Rack Guide: Roof vs Rear
Universal Handstand Suction Bike Rack: Roof Top & Rear Car Carrier for MTB and Road Bicycles
A suction-mounted bike rack can turn almost any vehicle into a capable bike hauler without permanent hardware. Handstand-style suction racks use vacuum cups and a fork or contact-point mount to keep the bike elevated and stable on smooth body panels or glass. The result is a setup that’s fast to install, easy to store, and flexible enough for sedans, hatchbacks, SUVs, and many vans—so long as you have a clean, flat surface to work with.
What a handstand suction bike rack is
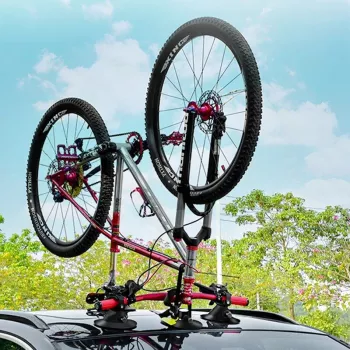
A handstand suction bike rack attaches to your vehicle using vacuum/suction cups rather than factory roof rails, a hitch receiver, or a trunk-hook strap system. Most designs support the bike at the fork (front wheel removed) and add a secondary rear support point to keep the bike from yawing side to side.
- Vacuum cups mount to smooth, non-porous surfaces like glossy paint or glass.
- The bike is typically held by the fork via a skewer or thru-axle interface, with the frame elevated above the vehicle surface.
- Universal fit depends on having enough flat area for full cup contact—more than on the vehicle’s make/model.
- Ideal for occasional trips, rentals, and riders who switch between vehicles frequently.
Roof-top vs rear mounting: choosing the safer, easier setup
Both roof and rear (hatch/trunk area) mounting can work well. The “best” choice usually comes down to surface quality (flatness and rigidity), loading height, and how often you’ll drive at highway speeds with the bike on the car.
- Roof-top advantages: keeps the rear hatch area clearer, reduces exposure to exhaust heat and road grime, and often sees steadier airflow around the bike.
- Roof-top tradeoffs: adds overall height and requires lifting the bike overhead; clearance planning is non-negotiable for garages, drive-thrus, and low branches.
- Rear advantages: easier loading height—especially helpful for heavier mountain bikes or riders with limited overhead reach.
- Rear tradeoffs: can obscure license plates/lights and is more exposed to turbulence and spray; the mounting surface must be smooth and rigid enough to resist flex.
- Best practice: choose the flattest, cleanest area that lets each cup pull straight—avoid placements where the cup is twisted or partially draped over a curve or seam.
| Factor | Roof Top | Rear (hatch/trunk area) |
|---|---|---|
| Loading effort | Higher lift; may need step stool | Lower lift; easier for heavier bikes |
| Vehicle clearance | Requires strict height awareness | Normal height but longer rear overhang awareness |
| Access to cargo | Often better hatch access | May limit hatch/trunk opening depending on placement |
| Exposure to debris | Typically cleaner airflow | More road spray and grime |
| Visibility/legal considerations | Usually less impact on plate/lights | May affect plate/lights; check local rules |
Bike compatibility: MTB and road setups to plan for
Handstand suction racks are highly adaptable, but bike fit still depends on axle standards, rotor clearance, and how you secure the removed front wheel.
- Road bikes: confirm whether your fork is quick release (QR) or thru-axle, and ensure the rack’s fork mount matches the correct standard.
- Mountain bikes: check for Boost spacing (commonly 15×110 front) and verify clearance for larger rotors and knobby tires once the wheel is removed and stored.
- Wheel-off transport: keep the fork dropouts protected and bring axle adapters when needed. Secure the removed wheel inside the vehicle or with a dedicated wheel strap so it can’t bounce into the frame.
- Frame protection: avoid clamping or strapping fragile aero tubes or pinching hydraulic hoses/shift housing. If straps contact paint, use a protective wrap.
- Weight limits: include the full riding weight—cages, bottles, bags, and tools can push you closer to the rack’s maximum rating.
How to Choose the right suction rack for your vehicle and riding style
Because suction racks aren’t vehicle-specific, the smartest “fit check” is about surfaces, cup layout, and how your bikes interface with the fork mount.
Installation and loading steps that reduce risk
Driving, clearance, and legal considerations
For broader safety guidance and trip planning, consult resources like the National Highway Traffic Safety Administration (NHTSA) and general transport best practices from Bicycling Magazine.
Care, maintenance, and storage for suction systems
FAQ
Will a suction bike rack damage car paint?
Clean, glossy paint is generally safe, but dirt trapped under a cup can scratch. Wash and fully dry the mounting area, avoid textured wraps/films that compromise suction, and inspect both the cup lips and the paint before and after use.
Can it carry both mountain and road bikes with different axles?
Yes, as long as the rack supports the axle standards you need (quick release vs. thru-axle) and you have the correct adapters. Confirm fork spacing as well—especially MTB Boost standards—so the mount matches each bike securely.
How often should vacuum cups be checked during a trip?
Check indicators after mounting, again after 10–15 minutes of driving, and then at regular stops like fuel or rest breaks. In extreme heat/cold or heavy rain, check more frequently and re-pump any cup showing vacuum loss.


Leave a comment
You must be logged in to post a comment.